Adjust inventory with barcodes
An inventory adjustment, or inventory audit, is the process of verifying the physical stock of products against the quantities recorded in the database. Regular audits ensure accurate inventory records, prevent stock discrepancies, and maintain efficient operations. In a warehouse setting, managers typically assign inventory counts to employees, who then walk to designated locations, scan product barcodes, and adjust quantities as needed.
Inventory adjustments can be completed through the Barcode application using a compatible scanner, or the Odoo mobile app.
Note
For a list of Odoo-compatible barcode mobile scanners, and other hardware for the Inventory and Barcode apps, refer to the Odoo Inventory • Hardware page.
See also
Tip
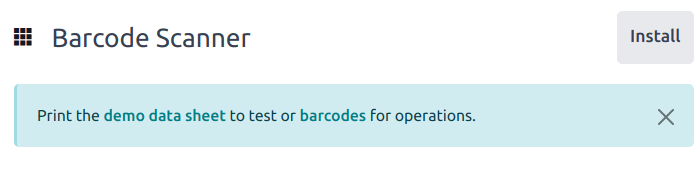
Odoo’s Barcode application provides demo data with barcodes to explore the features of the app. These can be used for testing purposes, and can be printed from the home screen of the app.
To access this demo data, navigate to the and click demo data sheet or barcodes in the banner above the scanner.
Assigning inventory counts
Before performing an inventory count, managers can assign counting tasks to employees. This can be done through by selecting specific locations and products for counting, and assigning a User to them. Once assigned, users will see pending counts when they open the Barcode app.
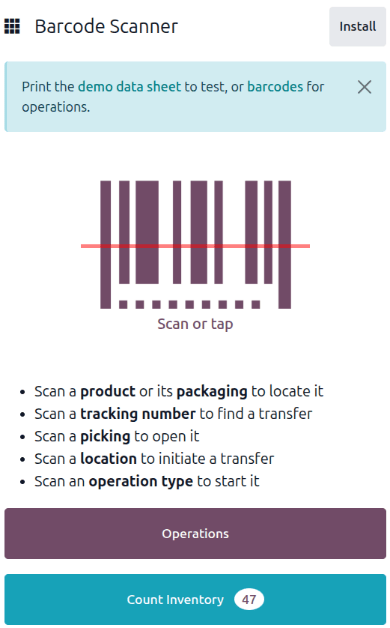
To view a requested inventory count, navigate to the dashboard. If a count has been requested, the number of products to be counted is listed on the Count Inventory button.

Configuration
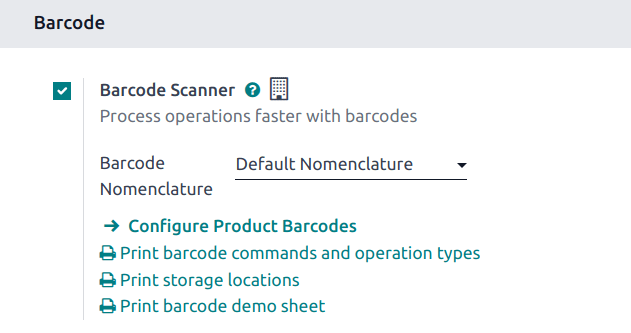
Before an inventory adjustment can be performed with the Barcode app, the app has to be installed and configured. Navigate to , and scroll to the Barcode section. Select the checkbox next to Barcode Scanner, and click Save to save any changes. If necessary, click Confirm on the pop-up.
Danger
Enabling the Barcode feature requires installing the Barcode application. Installing a new application on a One-App-Free database triggers a fifteen-day trial. At the end of the trial, if a paid subscription has not been added to the database, it will no longer be accessible.
After saving, a new drop-down menu appears under the Barcode Scanner option, labeled Barcode Nomenclature, where either Default Nomenclature or Default GS1 Nomenclature can be selected. Each nomenclature option determines how scanners interpret barcodes in Odoo.
To count products using barcodes, ensure that barcodes for products and storage locations are set up within Odoo first. Refer to this section for detailed instructions: Set Product Barcodes.
Performing an inventory count
To perform an inventory adjustment, first navigate to the . If assigned counts exist, tap Count Inventory to view pending tasks.
Walk to the designated storage location, then scan the location barcode.
Tip
If the warehouse multi-location feature is not enabled in the database, a source location does not need to be scanned. Instead, scan the product barcode to start the inventory adjustment.
Doing so highlights the location and displays all of the products stored there. Scan the barcode of each product to adjust its count.
Note
If no counts have been assigned to a user, and the Count Entire Locations feature is not enabled, no products may appear after the location barcode is scanned.
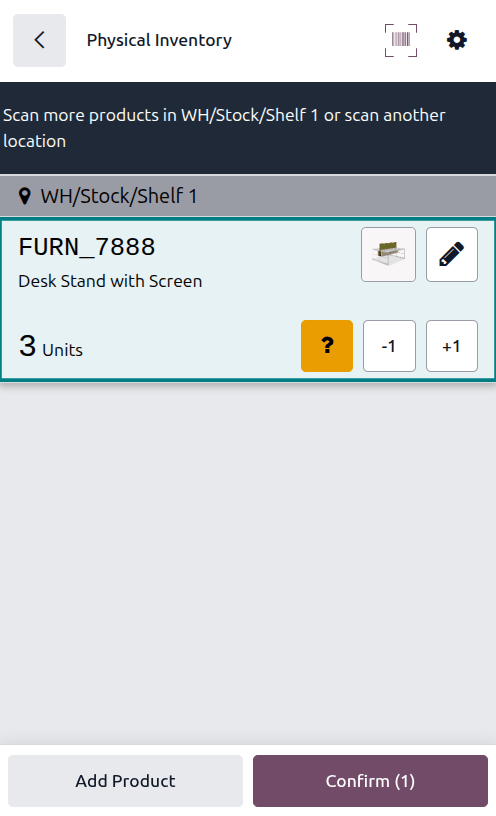
Manually adjust quantities if necessary by tapping the (edit) icon. Doing so opens a separate window with a keypad. Edit the number in the Quantity line to change the quantity. Additionally, the +1 and -1 buttons can be clicked to add or subtract quantity of the product, and the number keys can be used to add quantity, as well.
Example
In the below inventory adjustment, the source location WH/Stock/Shelf 1 was scanned, assigning
the location. Then, the barcode for the product [FURN_7888] Desk Stand with Screen was scanned
three times, increasing the units in the adjustment. Additional products can be added to this
adjustment by scanning the barcodes for those specific products.
Count entire locations
The Count Entire Locations feature assigns a user to count all the products within a location once they scan the barcode for that location. This allows for easier cycle counts by assigning an entire location to a user by assigning a single product count. During cycle counts, users can ensure accurate inventory numbers, see if products that should be in a location are missing, or discover products incorrectly stored within a location.
Important
You can only count entire locations if Storage Locations is enabled in the Inventory settings, found at .
To perform an inventory count of an entire location, navigate to . Tap the (actions) icon. Enter or scan a location barcode, and select the Count Entire Locations check box. Tap Apply. The app then displays all assigned products in that location. Proceed with the count as normal.
Show quantity to count
When conducting an inventory count, the expected quantity of products is not displayed by default, as displaying expected quantities can result in users relying on this count instead of performing a new count.
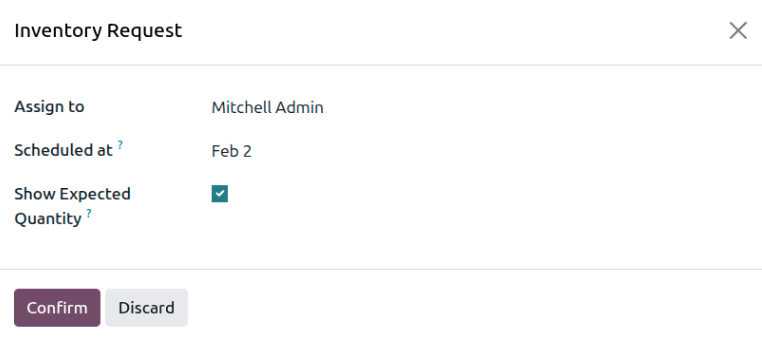
To show the expected quantity, navigate to . Request a count by selecting the check boxes to the left of the products to count, then clicking the Request a Count button. The Inventory Request window opens.
Specify a user to assign the count to in the Assign to field. Specify the date to perform the count in the Scheduled at field. Select the Show Expected Quantity check box to show the expected quantity on the Barcode Count Inventory page.
Example
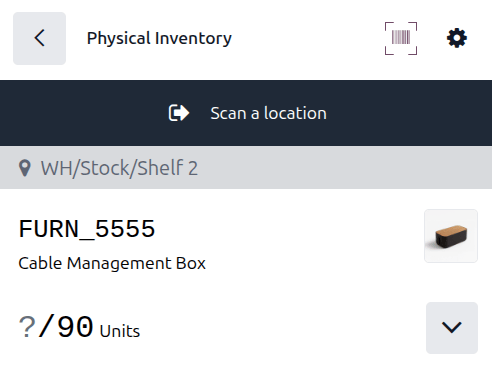
Warehouse managers have requested a count of all Cable Management Box products in inventory.
When the assigned user opens the Count Inventory page in the Barcode app, the
expected quantity of 90 units of the Cable Management Box product is displayed.
Manually add products to an inventory count
When barcodes for location or products are not available, Odoo Barcode can still be used to perform inventory counts.
To do this, navigate to .
To manually add products to this adjustment, click the white Add Product button at the bottom of the screen.
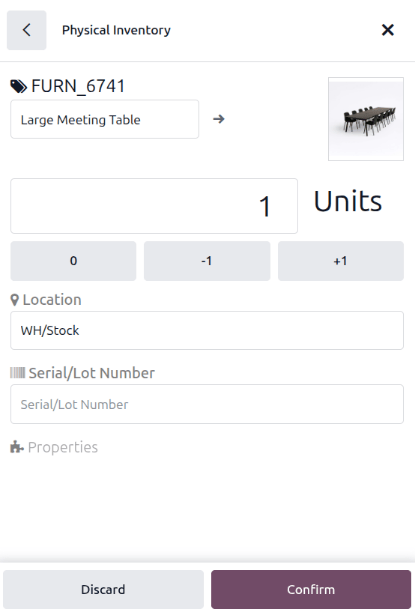
This navigates to a new, blank page where the desired product, quantity, and source location must be chosen.
First, click the Product line, and choose the product whose stock count should be
adjusted. Then, manually enter the quantity of that product, either by changing the 1 in the
Quantity line, or by clicking the +1 and -1 buttons to add or
subtract quantity of the product. The number pad can be used to add quantity, as well.
Below the number pad is the Location line, which should read WH/Stock by default.
Click this line to reveal a list of locations to choose from, and choose the location for this
inventory adjustment.
Click Confirm to confirm the changes.
Finalizing an inventory count
After counting all of the products, review the entries to ensure all the counted quantities are accurately entered. To complete the inventory adjustment, click Confirm.
Tip
The Validate barcode can be scanned in place of clicking the Confirm button.
Odoo then navigates back to the Barcode Scanning screen. A small green banner appears in the top-right corner, confirming the inventory count has been updated.